mental ray
Setup for CD vol III


return to main index


Introduction

Volume 3 of the mental images® reference books is accompanied by a CD that contains demo versions of mental ray suitable for Windows, Linux and MacOSX (32 & 64bit). Because the demo version of mental ray (mr) on the CD is "fully featured" these notes refer to it as Demo Complete. The CD contains an installer that assists users to get started with mental ray with the minimum of inconvenience. This tutorial addresses issues of,

  • a users directory structure to store their mr project files,
  • creating/editing a rayrc file so that the readers shaders can be referenced by mr,
  • creating a custom template file so that shaders can be built successfully.

Readers who have installed the version of mental ray (Demo Limited) that comes on the CD that accompanies volumes 1 and 2 of mental images reference books should refer to the tutorial "Mental Ray: Setup for CD vol I & II". For information about installing and setting up the Cutter text editor refer to the tutorial "Cutter: Installation".


The Users Directory Structure

When writing and testing shaders, users will create at least three types of documents, namely,

  • 'C' language shader source code files,
  • .mi shader interface description files,
  • .mi scene files.

This section recommends the adoption of a simple directory structure that will help the reader keep their files organized. It is suggested that directories named,

mi/shader_src
mi/shaders
mi/scenes
mi/manual

store shader source code files,
store compiled shaders,
store .mi scene files,
store mental ray documentation files.

The full paths to these directories are given in the tutorial "mental ray: Cutter Preferences". If Cutter's mental ray preferences are set correctly, mi interface description files will be automatically generated and saved in both the users shader_src and shaders directories.


The rayrc File

A rayrc file defines a series of search paths that enables mental ray to find compiled shaders, their accompanying .mi interface descriptions and other resources needed by the renderer.


Windows

During the installation of mental ray, users are given the opportunity to specify the location of the renderer and other resources. The default location used by the installer is,

    C:\Program Files\mental images\mental ray Demo 32-Bit Edition

These notes assume the user did not use the default location but, instead, specified the following path,

    C:\Program Files\mi

Within the mi directory the reader will find mental rays primary rayrc file. Rather than editing the primary rayrc file it is better for the reader to save a custom rayrc in their scenes directory ie.

    M:\mi\scenes\rayrc

A sample custom rayrc file is given below. Edit the paths shown in bold blue text so that they conform to the location of the readers custom shaders.


rayrc for Windows


registry    "{_MI_REG_LIBRARY}"
    value    "{$MI_BIN_PATH};M:\mi\shaders"
end registry
  
registry    "{_MI_REG_INCLUDE}"
    value    "{$MI_INC_PATH};M:\mi\shaders"
end registry


Linux & MacOSX

On Linux and MacOSX the primary .rayrc document, note the leading period, is located in,

    /usr/local/mi/.rayrc.

Rather than editing its contents it is better for the user to create a custom .rayrc file in the root directory of their user account. Sample .rayrc files are given below. Their text can be copied and pasted into the users custom file. However, take to edit the text shown in bold blue so that it conforms to the readers account name.


.rayrc for Linux


registry  "{_MI_REG_LIBRARY}"
    value  "/usr/local/mi/mrdemo/shaders;/users/USER_NAME/mi/shaders"
end registry

registry  "{_MI_REG_INCLUDE}"
    value  "/usr/local/mi/mrdemo/include;/users/USER_NAME/mi/shaders"
end registry


.rayrc for MacOSX


registry  "{_MI_REG_LIBRARY}"
    value  "/usr/local/mi/mrdemo/shaders;/Users/USER_NAME/Documents/mi/shaders"
end registry

registry  "{_MI_REG_INCLUDE}"
    value  "/usr/local/mi/mrdemo/include;/Users/USER_NAME/Documents/mi/shaders"
end registry


Windows Library "shader.lib"

This section is specific to users of Windows. A library file named "shader.lib" must be copied from,

    CD:\nt-x86-vc8\lib\shader.lib
.

to,

    C:\Program Files\lib\shader.lib
.


Customizing the Compilation of Shaders

As explained in the tutorial, "Cutter: Integration with mental ray", Cutter uses copies of operating specific templates to compile and link a shader. Its default templates are located in,
      Cutter_Help/templates/Makefile, and
      Cutter_Help/templates/Bat

The default templates work with fully licensed versions of mental ray as well as the demo version (Demo Limited) that comes with volumes I and II of the mental images reference books. However, readers who use the Demo Complete version of mental ray, from volume III, must create a customized version of a template. This section provides step-by-step instructions on how customization is achieved.


Step 1 - Open the Default Template

Windows users should open a copy of a template named Build_mishader.bat - figure 1.
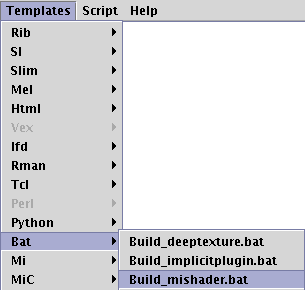


Figure 1


Linux and MacOSX users should open their operating specific makefile template. They are named, respectively, Makefile.mishader_LINUX and Makefile.mishader_OSX - figure 2.
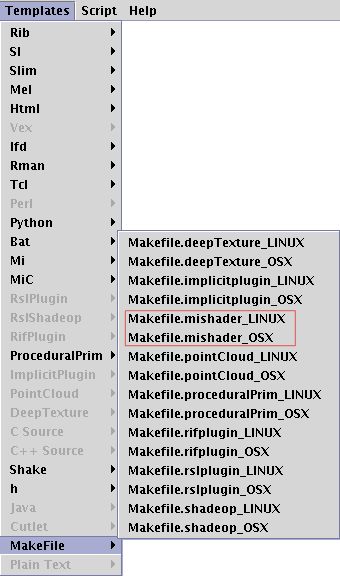


Figure 2


An untitled copy of the default template will open on Cutter's desktop.


Step 2 - Editing the Default Template

Windows users must search the untitled (.bat) template document for the following quoted text.

    "C:\Program Files\mental images\mental ray\include"
    "C:\Program Files\mental images\mental ray\lib\shader.lib"

Both strings must be edited so that the paths to the include and lib directories match the path to the directory in which they installed mental ray. For example, if the installation directory is C:\Program Files\mi then the edited strings must become,

    "C:\Program Files\mi\include"
    "C:\Program Files\mi\lib\shader.lib"

Linux and MacOSX users must, likewise, search their untitled (makefile) template document for the following text.

    -I/usr/local/mi/rayinc

It must be changed to

    -I/usr/local/mi/mrdemo/include

Step 3 - Saving the Custom Template

The edited template must be saved in the custom_templates directory that is located in the same directory as the cutter.jar file. The easiest way to do this is to choose the Save As a Template... menu item - figure 3.


Figure 3


On Windows the template should saved in the Bat sub-directory as Build_mishader.bat ie.

    custom_templates/Bat/Build_mishader.bat

On Linux and MacOSX the template must be saved in the Makefile sub-directory as either Makefile.mishader_LINUX or Makefile.mishader_OSX ie.

    custom_templates/Makefile/Makefile.mishader_LINUX
    custom_templates/Makefile/Makefile.mishader_OSX

Testing the Setup

The reader can check if their "settings" are correct by following the notes in the tutorial, "Cutter: Getting Started with mental ray"


© 2002- Malcolm Kesson. All rights reserved.