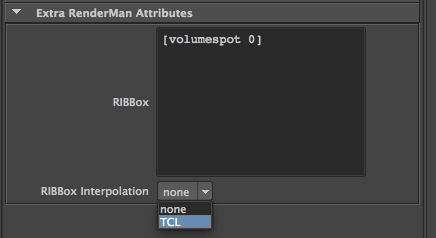
Figure 1
RMS 4. Deep map size 512, map generation time 4 seconds
intensity 1.5, decay rate "linear", [volumespot]
RfM Ribbox
|
Introduction
This tutorial presents a way of making a Maya spotlight behave as if it were a
volumetric light source. Although the method shown
here requires a moderate amount of setting up it does not rely on the use of additional
Maya geometry such as a cone to achieve its volumetric effect.
The TCL proc shown in listing 1 ensures that changes made to the spotlight, such as
its cone angle, penumbra angle and target location automatically modify the bounding
box parameters of a RMS 18
This tutorial was originally written for RMS 4. With the introduction of RMS 18 the
Slim |
|
|
Sourcing TCL Scripts
If the suggestions in the tutorial
"RfM: Customizing"
have been implemented by the reader then getting RenderMan Studio to source a TCL
script(s) is relatively easy. Create a directory named Listing 2 (RfM.ini)
|
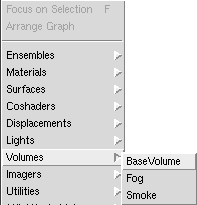
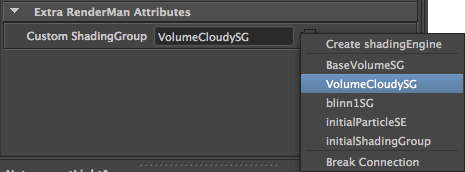
Work FlowStep 1Open the Slim shader editor and make an instance of the BaseVolume node.
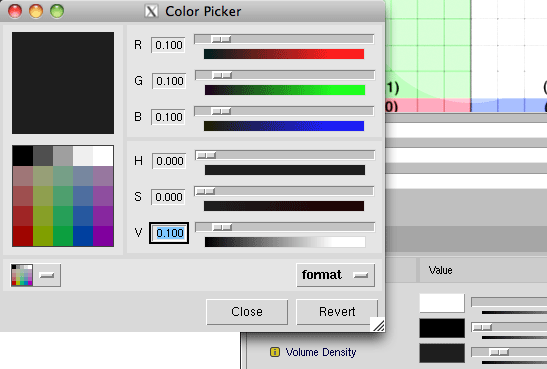
The "Volume Density" parameter should be lowered to 0.1. Choose "Add to Scene" from the popup menu (right mouse button). This will create VolumeDensitySG shading group in HyperShade. Despite its name the BaseVolume shader is NOT a traditional volume shader. It is a surface shader that performs full spherical lighting calculations as it "steps" its way through a volume.
Step 2
Create spotlight and set its position and the location of its "target". Step 3
Ignore this step when using RMS 18.
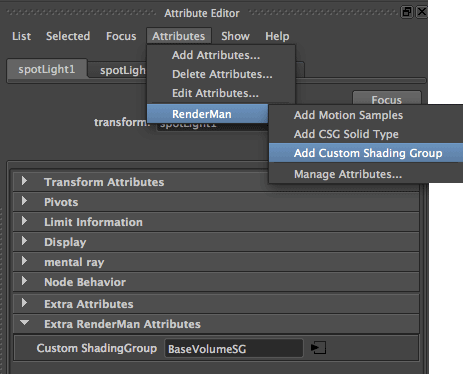
Step 4
Choose the transform tab, for example "spotLight1", and select,
|
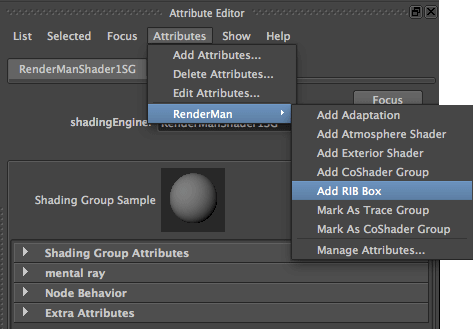
Step 5
Use the BaseVolumeSG tab and select, |
|||
|
|
|
||
Step 6
Enter the following text into the Rib Box. Be careful to include both the
opening and the closing bracket. |
|
|
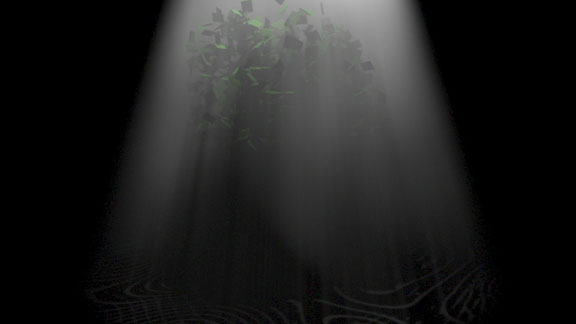
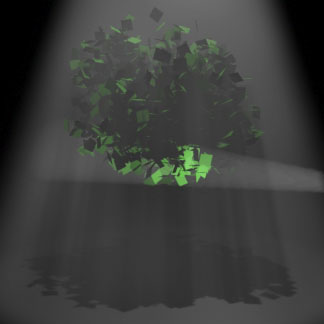
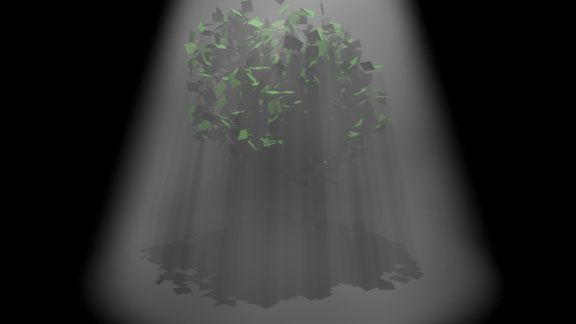
Selective Lighting - RMS 4 OnlyIt is rare to use a volumetric light in isolation. Using additional lights in a scene generally leads to the problem shown in figure 8 where the second light illuminates BOTH the geometry within the volume and the interior of the volume cone itself. Figure 9 shows what is more often required. |
|
|
|
|
To illustrate how a shader assigned to a volume can selectively respond to some lights the BaseVolume shader generated by Slim will be replaced by a custom surface shader - listing 3. Listing 3 (volumecloudy.sl)
The shader should be compiled and it's .slo file moved to the appropriate Maya project directory. Note it is a surface shader and consequently must be imported into HyperShade as a material. Incidently, despite it's name, BaseVolume is NOT a volume shader but is also a surface shader. Unlike most surface shaders both BaseVolume and the custom shader given in listing 3 do not calculate illuminance relative to a surface normal ie. illuminance(P,N,PI/2 ) {
but, instead, calculates the full spherical lighting contribution at each point that it samples within a volume ie. illuminance(P) {
Also, note the illuminance loop only accumulates a lighting value if, and only if, the lightsource being sampled has a parameter called "fogIntensity" with a value set to -1.0. The technique shown here is somewhat of a "hack" because the preferred way of selectively sampling specific lights is through the use of "categories". However, since there is not a way of tagging Maya lights with category names there is no alternative but to use the less efficient technique of looking for a specific lightsource shader parameter. |
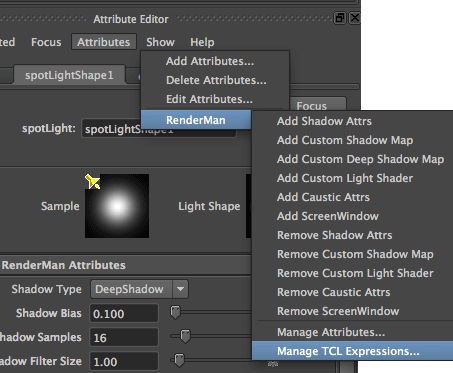
Selective Lighting Work FlowStep 1
Select the transform node of the "volume" spotlight.
Step 2
Select the shape node of the "volume" spotlight.
Step 3
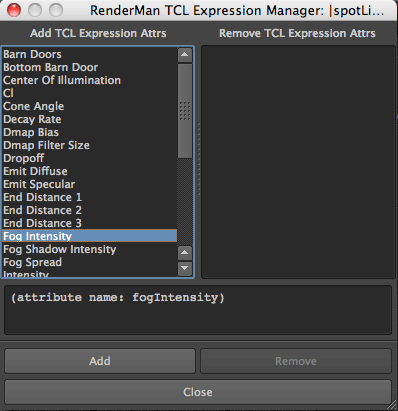
In the TCL Expression Manager choose
Step 4
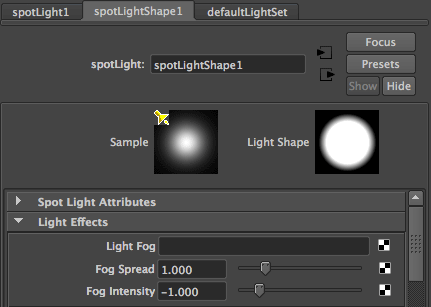
In the Fog Intensity Expr text field enter the following TCL.
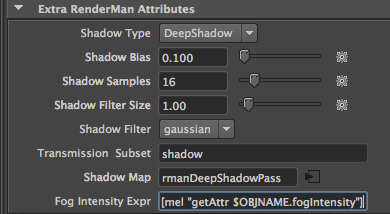
The TCL expression will force RfM to "expose" the fog intensity as a parameter of the lightsource shader that it generates - otherwise the value of fog intensity is "internal" to the shader. Step 5
In Light Effects set the value of Fog Intensity to -1.0.
Since all Maya lights either do not have a control called "Fog Intensity", for example directional lights, or they do not expose its value as a lightsource shader parameter they will not contribute to the illumination of a volume primitive. |
© 2002- Malcolm Kesson. All rights reserved.