Procedural Primitives
Placing Spheres


return to main index

Code:
    PlaceSpheresProc.cpp
    pp_place_spheres.py
    Download code.zip
    Download sample Maya project PlaceSpheres.zip


Introduction

This tutorial provides an explanation of how spheres can be rendered at the vertices of a polymesh by the use of a procedural primitive written in C/C++. The reader should review the tutorials,
    C++ Development Environment
    Procedural Primitives: Getting Started
    Procedural Primitives: Adding an Interface


Figure 1 (rollover)


The Procedural Primitive Code

Open the PlaceSpheresProc.cpp file and build the DSO using the keyboard shortcut Alt + e or Control + e.

A DSO (dynamic shared object) called PlaceSpheresProc.dll (Windows) or PlaceSpheresProc.so (OSX and Linux) will be created either in the same folder as the PlaceSpheresProc.cpp, or, if Cutter's preferences have been set as described in C++ Development Environment the DSO will can be found in,
    maya/rfm_scripts/proc_prims

The Python Code

Copy or move the pp_place_spheres.py script to either your
    maya/script folder, or your
    maya/rfm_scripts folder.


Using the Scripts in Maya

Either use the Maya scene provided in the PlaceSpheres.zip or follow these instructions.

Assuming a project directory called "PlaceSpheres" has been set in Maya, create a simple polymesh object such as a torus. From the RenderMan menu choose Archive->Create Procedural Node.
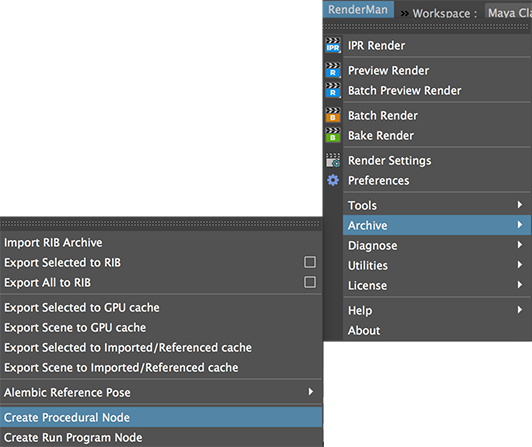


Figure 2


In Maya's outliner choose, Display->Shapes.
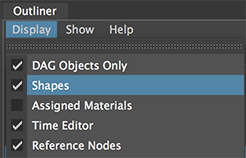


Figure 3


Parent the RenderManProgram node to the torus.


Figure 4


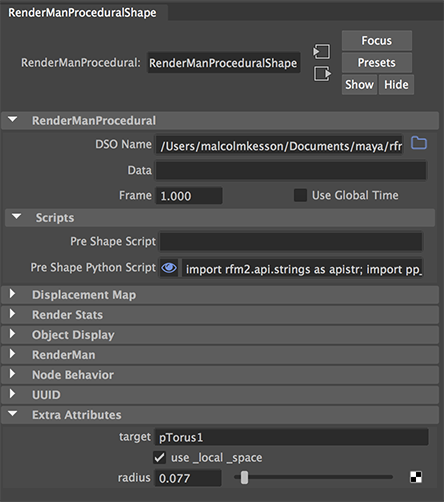
In the outliner select the RenderManProgramShape shape node. In the Attribute Editor for the RenderManProgramShape choose,
    Attributes->Add Attributes...
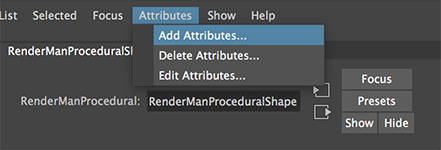


Figure 5


Create a float attribute named "radius",
a string attribute named "target", and
a boolean attribute named "use_local_space".

Make sure the names are lower case and that "Override nice name" is checked and that the nice name is also lower case. The new attributes will appear at the bottom of the panel. Make sure they have reasonable default values.


Figure 6


Connecting the Interface

As shown in figure 6 use the browse button for the DSO Name: and locate the PlaceSpheresProc.dll or PlaceSpheresProc.so file.

A small python script will be used to update the RenderManProgramShape Data textfield when the values of the custom float, string and boolean attributes are adjusted. Copy and paste the following code into the Pre Shape Python Script text field.


import rfm2.api.strings as apistr; import pp_place_spheres; pp_place_spheres.setDataStr(apistr.expand_string("<shape>"))

Note the code must be pasted as a single line of text.

When the scene is rendered the line of code in the Pre Shape Python Script text field will call the module implemented by the pp_place_spheres.py script.

The module queries the custom attributes and obtains a list of the coordinates of the vertices of the "target" object, say, pTorus1. The data is converted to a string and assigned to the Data text field. The RfM plugin passes the text to the PlaceSpheresProc.so (or .dll).

The ConvertParameters() procedure of the procedural primitive converts the text back into numeric values. The Subdivide() procedure uses the numeric values, "packaged" in a structure (effectively a small database), to create and position an arbitary number of spheres.


Because the vertices of the target object are evaluated before each frame is rendered the positions of the spheres are always "bound" to the shape of the polymesh.


© 2002- Malcolm Kesson. All rights reserved.