RslPlugin (Reyes)

aveOpacity


main index


Introduction

Developers can add their own custom functions to the RenderMan Shading Language (RSL) by writing 'C++' "plugins" that conform to Pixar's RslPlugin API (Application Programming Interface). This tutorial demonstrates how a relatively simple plugin called "aveOpacity" can be built and tested using Cutter. The plugin implements a RSL function that creates a text file containing some simple statistics about the geometry to which the shader has been assigned. However, the main purpose of this tutorial is not to produce a file containing statistics but rather to enable the reader to set up Cutter so that they can develop useful plugins.

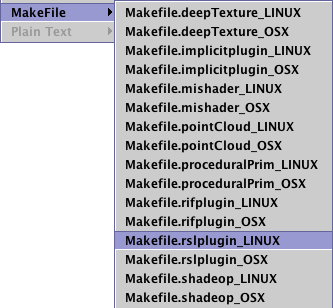
The source code for the plugin that is used in this tutorial can be found under Cutter's Templates menu.
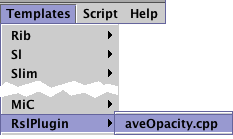


Figure 1


Step 1

Create a folder (project directory) in which you can save the plugin files.


Step 2

Set the locations of your "rsl source" and "shader" files.
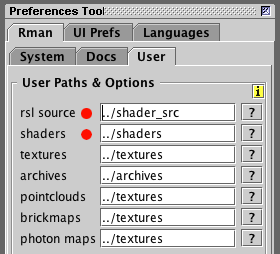


Figure 2


Step 3

In Cutter's->Edit->Preferences set the root directory of Pixar's devkit - figure 3. This will generally be the same folder as the RenderManProServer installation directory.


Figure 3


Step 4

Save the file aveOpacity.cpp into your project directory. Use the keyboard shortcut Alt+e or Control+e to build the plugin. If the Cutter's Process Monitor window shows an error you must fix the problem before continuing. For example, under Linux you may get this error.

    g++ -Wall -fPIC -I/usr/include -I./ -I"/opt/pixar/RenderManProServer-15.2/include"
    -c aveOpacity.cpp
    /bin/sh: g++: command not found
    make: *** [aveOpacity.o] Error 127

This particular problem has been caused by a compiler named g++34 being installed instead of the "standard" g++ compiler. The next step shows how a custom makefile can be set up in Cutter so that you can specify the name of the compiler you wish to use. Be warned, however, that solving compilation issues on Linux and MacOSX are easy in comparison to resolving similar issues on Windows.


Step 5 - Customizing Cutter's Makefile

If, during the previous step, no errors were reported in the Process Monitor you can ignore this step.

The notes in this section assume the reader is using the Linux operating system. From Cutter's Templates menu choose the Makefile appropriate to your operating system. For example, figure 4 shows the choice for Linux.


Figure 4


Cutter comes with many template makefiles so be careful to select the correct one. Replace all instances of g++ with the correct name of the compiler, for example, g++34 - listing 1.


Listing 1 (Makefile.rslplugin_LINUX)


STRICT	= -Wall -fPIC
CFLAGS	= ${STRICT} -I/usr/include -I./ -I"_DEVKIT_PATH_/include" _OTHER_INCLUDE_DIRS_
LDFLAGS	= -export-dynamic -shared
LIBPATH	= _OTHER_LIB_DIRS_
LIBS	= _OTHER_LIBS_
OBJS	= _RSLPLUGIN_NAME_.o _OTHER_OBJS_

.cpp.o :
	g++34 $(CFLAGS) -c $<
.c.o :
	g++34 $(CFLAGS) -c $<

all: _RSLPLUGIN_NAME_.so

_RSLPLUGIN_NAME_.so : ${OBJS}
	g++34 -g -fPIC ${LDFLAGS} ${LIBPATH} ${LIBS} ${OBJS} -o $@
	rm ./_RSLPLUGIN_NAME_.o

Without making any other edits save the document in your custom_templates/MakeFile directory as,
    Makefile.rslplugin_LINUX
Use Alt + e or Control + e to build the plugin. Cutter will use your newly modified template to generate a makefile customized for your current plugin. If the build has again failed then open the makefile. It can be found in the same directory as the aveOpacity.cpp file - its name will be "Makefile.aveOpacity". The makefile should show the same edits that you made to your custom template. If it does not show the edits it is because you did not save the template in the correct directory. If the build has been successful Cutter will copy the plugin (aveOpacity.so) to the "rsl source" and "shaders" directories.

For more information about building plugins refer to the tutorial "Pixar's Devkit: Cutter's Devkit Authoring Environment".


Step 6 - Preparing a Shader

Assuming the reader has got this far the next step is to compile a shader that uses the plugin. The source code for a simple shader that uses the aveOpacity plugin is shown in listing 2.


Listing 2 (plugtest.sl)


plugin "aveOpacity";
  
surface 
plugtest(string dataName = "")
{
Oi = Os;
Ci = Oi * Cs;
if(dataName != "")
    aveOpacity(Oi, area(P, "dicing"), dataName);
}

Save the code for the shader in your "rsl source" directory. Compile the shader using Alt + e or Control + e. For the shader to compile successfully the plugin aveOpacity.so (aveOpacity.dll on windows) must be in the same directory as the source code of the shader ie. the "rsl source" directory.


Step 7 - Rendering

A rib file that uses the plugtest shader is shown below.


Listing 3 (plugtest.rib)


Option "searchpath" "shader"  "@:../shaders"
Display "plugtest" "it" "rgba"
Format 427 240 1
Projection "perspective" "fov" 20
ShadingRate 1
  
Translate  0 0 3
Rotate -30 1 0 0
Rotate 0   0 1 0
Scale 1 1 -1
WorldBegin
    Surface "plugtest"
            "string dataName" ["./polygon.txt"]
    Polygon "P" [-0.5 0 -0.5  -0.5 0 0.5  0.5 0 0.5  0.5 0 -0.5]
                "st" [0 0  0 1  1 1  1 0]
WorldEnd

After rendering the rib you should find a data file named "polygon.txt" in the Cutter directory. It will contain the following information.

    1.000 1.000 1.000
    1.155
    33728

The first line gives the average values for the rgb opacities of the entire polygon. The second line is a summation of the area's of all the micro-polygons and the last value is a count of the micro-polygons. Fairly useless information but if the reader is able to successfully produce the data file they can be sure their RslPlugin development environment is properly set up.


© 2002- Malcolm Kesson. All rights reserved.