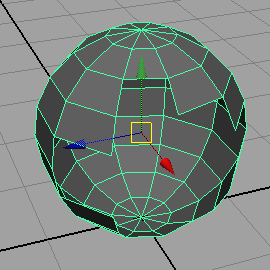
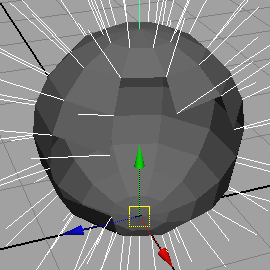
Mel

Secondary Geometry


main index


Examples

Introduction

There are situations where (primary) geometry in a Maya scene can be used as a source of data from which secondary geometries can be derived. Such geometry might be used to augment the original Maya object(s) or the geometry might be "exported" from Maya in a format that enables it to be rendered by an external (stand-alone) renderer such as Pixar's prman.


Core Code

This section provides the basic code used by the "query geometry" examples presented in this tutorial.


Getting the Coordinates of Vertices

Several of the sample scripts query a polymesh in order to get the xyz coordinates of its vertices or selected vertices. The following proc, getVertices(), performs the query and assigns the data to an array of vectors.


Getting the Coordinates of Smoothed Normals

It is often necessary to find the interpolated (ie. smoothed) normal at each vertex, or selected vertex, of a polymesh. The following proc, getNormals(), performs the query and assigns the data to an array of vectors.

Several of the sample scripts also use the following code, in one form or another, to write a text file to a directory in the Maya project folder. The name of the output file, and its file extension, will depend on the use that will be made of the data.


    string  $projPath = `workspace -q -rootDirectory`;
    string  $path = $projPath + "data/temp.mel";
    int     $fileid = fopen($path, "w");
    // Assume "pos" is an array of xyz values...
    fprint($fileid, $pos[0] + " " + $pos[1] + " " + $pos[2] + "\n");
    fclose $fileid;

Example 3 queries a curve at regular intervals to determine the coordinates of points along the curve. The next snippet of Mel code demonstrates the basic technique of performing such a query.


global proc getCurveData(string $tnode, float $step, vector $data[]) {
    int     $count = size($data);
    string  $part;
    float   $pos[];
    int     $spans = `getAttr ($tnode + ".spans")`;
    for($i = 0.0;$i <= 1.0;$i = $i + $step) {
        $pos = `pointOnCurve -pr ($i * $spans) -p $tnode`;
        $data[$count] = <<$pos[0], $pos[1], $pos[2]>>;
        $count++;
        }
    }
vector $data[];
getCurveData("curve1", 0.005, $data);
for($i = 0; $i < size($data); $i++) {
    vector $pos = $data[$i];
    print($pos.x + " " + $pos.y + " " + $pos.z + "\n");
    }

The next code sample is the Mel equivalent of the python code that queries particle positions - listings 4.2, 4.4 and 6. It is provided here merely to demonstrate how such a query is done using Mel.


global proc getParticleData(string $tnode, vector $data[])
    {
    int     $count = size($data);
    string  $part;
    float   $pos[];
    int     $num = `particle -q -ct particle1`; 
    for($n = 0; $n < $num; $n++) {
        $part = $tnode + ".pt[" + $n + "]";
        $pos = `getParticleAttr -at position $part`;
        $data[$count] = <<$pos[0], $pos[1], $pos[2]>>;
        $count++;
        }
    }
vector $data[];
getParticleData("particle1", $data);
for($i = 0; $i < size($data); $i++) {
    vector $pos = $data[$i];
    print($pos.x + " " + $pos.y + " " + $pos.z + "\n");
    }


Example 1 - Polymesh Normals

Listing 1 provides code to write a Mel file containing a list of curve statements. After generating the file it is source'd by the script. The linear curves are positioned at each vertex of the poly mesh - figure 2. The curves are aligned to the smoothed normals of the mesh. The curves could be directly added to the Maya scene without the need to write a Mel file. However, recording the secondary geometry to a file does provide an opportunity to reuse the curves for some other purpose.


Figure 1


Figure 2


Listing 1.1 (meshNormals.mel)


global proc string meshNormals()
{
string  $projPath = `workspace -q -rootDirectory`;
string  $path = $projPath + "data/temp.mel";
int     $fileid = fopen($path, "w");
string  $obj[] = `ls -sl`;
vector  $verts[], $norms[];
  
for($j = 0; $j < size($obj); $j++) {
    getVertices($obj[$j], $verts);
    getNormals($obj[$j],  $norms);
    }
if(size($verts) != size($norms)) {
    print("Error. Unequal number of vertices and normals!\n");
    return "";
    }
vector $v, $n;    
for($j = 0; $j < size($verts); $j++) {
    $v = $verts[$j];
    $n = $norms[$j];
    $p1 = <<$v.x, $v.y, $v.z>>;
    $p2 = <<$v.x + $n.x, $v.y + $n.y, $v.z + $n.z>>;
    fprint($fileid, "curve -d 1");
    fprint($fileid, " -p " + $p1.x + " " + $p1.y + " " + $p1.z);
    fprint($fileid, " -p " + $p2.x + " " + $p2.y + " " + $p2.z + ";\n");
    }
fclose $fileid;
return $path;
}
  
// Call the proc
string $path = meshNormals();
string $cmd = "source \"" + $path + "\";";
eval($cmd);

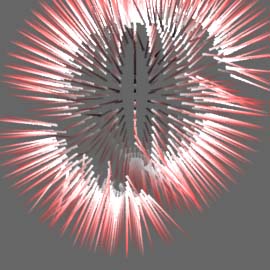
Listing 1.2 demonstrates how the curves can be written to an archive rib file. RenderMan curves can be given interesting attributes such as varying width, color and opacity - figure 3.


Figure 3


Listing 1.2 (rmanNormals.mel)


global proc string rmanNormals(float $base, float $tip)
{
string  $projPath = `workspace -q -rootDirectory`;
string  $path = $projPath + "data/rmanNormals.rib";
int     $fileid = fopen($path, "w");
string  $obj[] = `ls -sl`;
vector  $verts[], $norms[];
  
for($j = 0; $j < size($obj); $j++) {
    getVertices($obj[$j], $verts);
    getNormals($obj[$j],  $norms);
    }
if(size($verts) != size($norms)) {
    print("Error. Unequal number of vertices and normals!\n");
    return "";
    }
fprint($fileid, "AttributeBegin\n");
vector $v, $n;    
for($j = 0; $j < size($verts); $j++) {
    $v = $verts[$j];
    $n = $norms[$j];
    $p1 = <<$v.x, $v.y, $v.z>>;
    $p2 = <<$v.x + $n.x, $v.y + $n.y, $v.z + $n.z>>;
    fprint($fileid, "\tCurves \"linear\" [2] \"nonperiodic\"\n");
    fprint($fileid, "\t\t\"P\" [" + $p1.x + " " + $p1.y + " " + $p1.z +
                              " " + $p2.x + " " + $p2.y + " " + $p2.z + "]\n");
    fprint($fileid, "\t\t\"width\" [" + $base + " " + $tip + "]\n");
    fprint($fileid, "\t\t\"Cs\" [1 1 1  1 0 0]\n");
    }
fprint($fileid, "AttributeEnd\n");
fclose $fileid;
return $path;
}
  
// Call the proc
string $path = rmanNormals(0.03, 0.001);

The rib file used to render figure 1.3 is shown below. For some basic information about RenderMan curves refer to the tutorial Rib: Curve Basics


Listing 1.3 (testCurves.rib)


# Note the use of this Hider to improve the rendering of
# the curves
Hider "stochastic" "int sigma" [1] "float sigmablur" [1.0]
Display "untitled" "it" "rgb"
Format 270 270 1
Projection "perspective" "fov" 20
ShadingRate 1
  
LightSource "distantlight" 1 "intensity" 1.5 "from" [0 0 0] "to" [0 0 1]
  
Translate  0 -0.75 10
Rotate -30 1 0 0
Rotate 0   0 1 0
Scale 1 1 -1
Imager "background" "background" [.4 .4 .4]
WorldBegin
    TransformBegin
        LightSource "pointlight" 2 "intensity" 25 "from" [1 4 1]
    TransformEnd
    Surface "plastic"
    AttributeBegin
        # Again, note the use of these attributes
        Attribute "dice" "hair" [1]
        Attribute "stochastic" "int sigma" [1]
        ReadArchive "PATH_TO_ARCHIVE/rmanNormals.rib"
    AttributeEnd
WorldEnd


Example 2 - Polymesh as RenderMan Blobbies

Listing 2 demonstrates how the vertices of a poly mesh can be used to generate an archive rib file that contains the specification of a RenderMan blobby. For a basic introduction to RenderMan blobbies refer to the tutorial "RenderMan Procedural Primitives: Blobbies".


Figure 4


Figure 5


Listing 2 (blobbyFromMesh.mel)


global proc meshToBlobby(string $path, float $scale)
{
string  $obj[] = `ls -sl`;
vector  $verts[];
for($n = 0; $n < size($obj); $n++)
    getVertices($obj[$n], $verts);
    
int $numBlobs = size($verts);
int $fileid = fopen($path, "w");
  
// Setup the initial definition of the blobby.
fprint($fileid, "Blobby " + $numBlobs + " [\n");
  
// Make each blob an ellipsoid and provide its array
// index. The indices monotonously increment by 16.
for($n = 0; $n < $numBlobs; $n++)
    fprint($fileid, "1001 " + ($n * 16) + "\n");
  
// Specify the blending code "0" and the number of 
// blobs to blend.
fprint($fileid, "0 " + $numBlobs);
  
// Specify the list of the indices from the first
// to the last blob.
for($n = 0; $n < $numBlobs; $n++)
    fprint($fileid, " " + $n);
fprint($fileid, "]\n[\n");
  
string  $row1, $row2, $row3, $row4;
float   $v[];
  
// Specify the transformations of each blob
for($n = 0; $n < $numBlobs; $n++) {
    $row1 = $scale + " 0 0 0 ";
    $row2 = " 0 " + $scale + " 0 0 ";
    $row3 = " 0 0 " + $scale + " 0 ";
    $v = $verts[$n];
    $row4 = $v[0] + " " + $v[1] + " " + $v[2] + " 1\n";
    fprint($fileid, $row1 + $row2 + $row3 + $row4);
    }
fprint($fileid, "] [\"\"]\n");
  
// Close the archive file
fclose $fileid;
}
  
// Call the proc
$path = getenv("HOME");
$path += "/meshToBlobby.rib";
meshToBlobby($path, 0.3);


Example 3 - Curves as a RenderMan Blobbies

Listing 3 demonstrates how a curve, or curves, can be queried in order to generate an archive rib file that contains the specification of a RenderMan blobby.


Figure 6


Figure 7


Listing 3 (curveToBlobby.mel)


global proc curveToBlobby(string $path, float $scale, float $step)
{
string  $curves[] = `ls -tr "curve*"`;
vector  $data[];
float   $pnt[];
int     $count = 0;
  
for($n = 0; $n < size($curves); $n++) {
    int   $spans = `getAttr ($curves[$n] + ".spans")`;
    for($i = 0.0;$i <= 1.0;$i = $i + $step) {
        $pnt = `pointOnCurve -pr ($i * $spans) -p $curves[$n]`;
        $data[$count] = <<$pnt[0], $pnt[1], $pnt[2]>>;
        $count++;
        }
    }
int $numBlobs = size($data);
    
int $fileid = fopen($path, "w");
  
// Setup the initial definition of the blobby.
fprint($fileid, "Blobby " + $numBlobs + " [\n");
  
// Make each blob an ellipsoid and provide its array
// index. The indices monotonously increment by 16.
for($n = 0; $n < $numBlobs; $n++)
    fprint($fileid, "1001 " + ($n * 16) + "\n");
  
// Specify the blending code "0" and the number of 
// blobs to blend.
fprint($fileid, "0 " + $numBlobs);
  
// Specify the list of the indices from the first
// to the last blob.
for($n = 0; $n < $numBlobs; $n++)
    fprint($fileid, " " + $n);
fprint($fileid, "]\n");
fprint($fileid, "[\n");
  
string  $row1, $row2, $row3, $row4;
vector  $pos;
  
// Specify the transformations of each blob
for($n = 0; $n < $numBlobs; $n++) {
    $row1 = $scale + " 0 0 0 ";
    $row2 = " 0 " + $scale + " 0 0 ";
    $row3 = " 0 0 " + $scale + " 0 ";
    $pos = $data[$n];
    $row4 = $pos.x + " " + 
            $pos.y + " " + 
            $pos.z + " 1\n";
    fprint($fileid, $row1 + $row2 + $row3 + $row4);
    }
fprint($fileid, "]\n");
fprint($fileid, "[\"\"]\n");
  
// Close the archive file
fclose $fileid;
}
  
// Call the proc
string  $projPath = `workspace -q -rootDirectory`;
string  $path = $projPath + "data/blobbyCurve.rib";
curveToBlobby($path, 0.8, 0.01);


Example 4 - Particles as Maya & RenderMan Curves

The two examples in this section show how a particle system (figure 8) can be used to generate a number of maya curves (figure 9) and RenderMan curves (figure 10). The curves are defined by the trajectories followed, over time, by each particle in the system. The code for both examples is based on that presented in the section, Using Particles to Generate Curves, in the tutorial,
    RfM: Sample Ri Scripts I
Because the sample code uses the python scripting language the reader should review the following tutorial in order to set their Maya/python environment,
    Maya: Setup for Python

The Mel scripts shown in listings 4.1 and 4.3 are relatively trivial because they delegate most of the "heavy lifting" to their corresponding python scripts - listings 4.2 and 4.4. Using a particle system to define curves consists of the following steps.

  1. for each frame of animation the Mel script "calls" the python script,
  2. at the start of the animation a particle cache is initialized,
  3. for each frame, each particle (xyz) position is added to the particle cache,
  4. at the end of the animation either Maya or RenderMan curves are written to file,
        and finally,
  5. either the .mel file is sourced or the .rib file is rendered.

The Mel scripts handle steps 1 and 5, while steps 2, 3 and 4 are handled by the python scripts.


Figure 8


Figure 9 - Curves as Maya curves


Listing 4.1 (particlesToMayaCurves.mel)


global proc particlesToMayaCurves(int $startAt)
{
string  $particle[] = `ls -tr "particle*"`;
string  $tnode = $particle[0];
$tnode = "\"" + $tnode + "\"";
  
python("import particlesToMayaCurves as ptmc");
$pycommand = "ptmc.particlesToMayaCurves(" + $tnode + "," + $startAt + ")";
python($pycommand);
}
  
int $endFrame = `getAttr defaultRenderGlobals.endFrame`;
for($n = 1; $n <= $endFrame; $n++) {
    currentTime $n;
    particlesToMayaCurves(1);
    }
//source "PATH_TO_CURVES.mel";


Listing 4.2 (particlesToMayaCurves.py)


import maya.cmds as mc
  
class Cache:
    def init(self):
        self.data = []
    def add(self, index, pos):
        if len(self.data) > index:
            xyz = pos[0:3]
            self.data[index].append(xyz[0])
            self.data[index].append(xyz[1])
            self.data[index].append(xyz[2])
        else:
            self.data.append(pos[0:3])
    def get(self, index):
        return self.data[index]
    def length(self):
        return len(self.data)
  
pCache = Cache()
  
#-----------------------------------------
def getSceneName():
    name = mc.file(q = True, sceneName = True, shortName = True)
    if len(name) == 0:
        name = "untitled"
    else:
        name = name[:len(name) - 3]
    return name
#-----------------------------------------
def getDataDir():
    projPath = mc.workspace(q = True, rootDirectory = True)
    return projPath + "data"
#-----------------------------------------
# Particle positions are queried in this function
def updateCache(tnode):
    global pCache
    pnum = mc.particle(tnode, q = True, count = True)
    for n in range(pnum):
        pname = tnode + ".pt[%s]" % n
        pos = mc.getParticleAttr(pname,at = 'position')
        pCache.add(n, pos)
#-----------------------------------------        
def particlesToMayaCurves(tnode, startAt):
    global pCache
    
    currFrame = mc.currentTime(q = True)
    endFrame = mc.getAttr("defaultRenderGlobals.endFrame");
    
    if currFrame == 1:
        pCache.init()
    if currFrame >= startAt and currFrame <= endFrame:
        updateCache(tnode)
    if currFrame == endFrame:
        index = 0
        pathToCurves = getDataDir() + "/" + getSceneName() + ".mel";
        fileid = open(pathToCurves, 'w')
        for n in range(pCache.length()):
            xyz = pCache.get(n)
            if len(xyz)/3 >= 4:
                melOut = "curve -d 3 -p "
                fileid.write(melOut)
                pcount = 0
                for i in range(len(xyz)):
                    if pcount == 3:
                        pcount = 0
                        fileid.write(" -p ")
                    fileid.write('%s ' % (xyz[i]))
                    pcount = pcount + 1
                melOut = ';\n'
                fileid.write(melOut)
        fileid.close()


Figure 10 - RenderMan curves


Listing 4.3 (particlesToRmanCurves.mel)


global proc particlesToRmanCurves(int $startAt, float $width)
{
string  $particle[] = `ls -tr "particle*"`;
string  $tnode = $particle[0];
$tnode = "\"" + $tnode + "\"";
  
python("import particlesToRmanCurves as ptmc");
$pycommand = "ptmc.particlesToRmanCurves(" +
             $tnode + "," + $startAt + "," +$width + ")";
python($pycommand);
}
  
int $endFrame = `getAttr defaultRenderGlobals.endFrame`;
for($n = 1; $n <= $endFrame; $n++) {
    currentTime $n;
    particlesToRmanCurves(1, 0.01);
    }


Listing 4.4 (particlesToRmanCurves.py)


import maya.cmds as mc
  
class Cache:
    def init(self):
        self.data = []
    def add(self, index, pos):
        if len(self.data) > index:
            xyz = pos[0:3]
            self.data[index].append(xyz[0])
            self.data[index].append(xyz[1])
            self.data[index].append(xyz[2])
        else:
            self.data.append(pos[0:3])
    def get(self, index):
        return self.data[index]
    def length(self):
        return len(self.data)
  
pCache = Cache()
  
#-----------------------------------------
def getSceneName():
    name = mc.file(q = True, sceneName = True, shortName = True)
    if len(name) == 0:
        name = "untitled"
    else:
        name = name[:len(name) - 3]
    return name
#-----------------------------------------
def getDataDir():
    projPath = mc.workspace(q = True, rootDirectory = True)
    return projPath + "data"
#-----------------------------------------
def updateCache(tnode):
    global pCache
    pnum = mc.particle(tnode, q = True, count = True)
    for n in range(pnum):
        pname = tnode + ".pt[%s]" % n
        pos = mc.getParticleAttr(pname,at = 'position')
        pCache.add(n, pos)
#-----------------------------------------        
def particlesToRmanCurves(tnode, startAt, width):
    global pCache
    
    currFrame = mc.currentTime(q = True)
    endFrame = mc.getAttr("defaultRenderGlobals.endFrame");
    
    if currFrame == 1:
        pCache.init()
    if currFrame >= startAt and currFrame <= endFrame:
        updateCache(tnode)
    if currFrame == endFrame:
        index = 0
        pathToCurves = getDataDir() + "/" + getSceneName() + ".rib";
        
        fileid = open(pathToCurves, 'w')
        fileid.write('Basis "catmull-rom" 1 "catmull-rom" 1\n')
        for n in range(pCache.length()):
            xyz = pCache.get(n)
            if len(xyz)/3 >= 4:
                rib = 'Curves "cubic" [%d] "nonperiodic" "P" [\n' % (len(xyz)/3)
                fileid.write(rib)
                for i in range(len(xyz)):
                    fileid.write("%s " % (xyz[i]) )
                rib = '\n] "constantwidth" [%f] \n' % width
                fileid.write(rib)
        fileid.close()


Example 5 - Particles as RenderMan Blobbies

This example is an adaptation of the code presented in example 4. Listing 5.2 uses particle positions to define a blobby RenderMan primitive. The python script generates a sequence of numbered archive rib files - one for each frame of animation. As with the previous example, the mel script (listing 5.1) is relatively simple because most of the work is done by the python script.

A sequence of numbered rib can be conveniently rendered with the Cutter text editor. Listing 5.3 shows an example of a "key frame" file. For more information about Cutter's key framing capabilities refer to the tutorial "Cutter: Key Framing".


Figure 11


Listing 5.1 (particlesToBlobbies.mel)


global proc particlesToBlobbies(int $startAt, float $scale)
{
string  $particle[] = `ls -tr "particle*"`;
string  $tnode = $particle[0];
$tnode = "\"" + $tnode + "\"";
python("import particlesToBlobbies as ptb");
$pycommand = "ptb.particlesToBlobbies(" + $tnode + "," + 
                                          $startAt + "," +
                                          $scale + ")";
python($pycommand);
}
int $endFrame = `getAttr defaultRenderGlobals.endFrame`;
for($n = 1; $n <= $endFrame; $n++) {
    currentTime $n;
    particlesToBlobbies(1, 0.8);
    }


Listing 5.2 (particlesToBlobbies.py)


import maya.cmds as mc
 
def addPadding(num):
    num = int(num)
    if num < 10:
        return "000%s" % num
    elif num <= 100:
        return "00%s" % num
    elif num <= 1000:
        return "0%s" % num
    return num
  
#-----------------------------------------
def getSceneName():
    name = mc.file(q = True, sceneName = True, shortName = True)
    if len(name) == 0:
        name = "untitled"
    else:
        name = name[:len(name) - 3]
    return name
#-----------------------------------------
def getDataDir():
    projPath = mc.workspace(q = True, rootDirectory = True)
    return projPath + "data"
#-----------------------------------------
def getPositions(tnode):
    pnum = mc.particle(tnode, q = True, count = True)
    data = []
    for n in range(pnum):
        pname = tnode + ".pt[%s]" % n
        pos = mc.getParticleAttr(pname,at = 'position')
        data.append(pos[0:3])
    return data
#-----------------------------------------
def getMatrix(scale, x, y, z):
    mat = '%s 0 0 0  0 %s 0 0  0 0 %s 0' % (scale,scale,scale)
    mat += ' %s %s %s 1' % (x,y,z)
    return mat
#-----------------------------------------
def getBlobby(tnode, scale):
    ellipsoid_ID = "1001 "
    index = 0
    data = getPositions(tnode)
    blob_count = len(data)
    
    out = 'Blobby %s ' %  blob_count
    
    # begin the first block
    out += "[\n"
    for n in range(blob_count):
        out += '%s %s ' % (ellipsoid_ID, index)
        out += "\n"
        index += 16
        
    # define the blobby operator and indices of
    # the blobs forming a "set" ie. group
    addition_operator = 0
    out += '%s %s ' % (addition_operator, blob_count)
    for n in range(blob_count):
        out += '%s ' % n
    out += "]\n"
    
    # begin the transforms block
    out += "[\n"
    for xyz in data:
        x = xyz[0]
        y = xyz[1]
        z = xyz[2]
        out += '%s \n' % (getMatrix(scale,x,y,z))
    out += "]\n"
    
    # begin the depth map block
    out += "[\"\"]\n"
    return out
        
def particlesToBlobbies(tnode, startAt, scale):
    global pCache
    
    currFrame = mc.currentTime(q = True)
    endFrame = mc.getAttr("defaultRenderGlobals.endFrame");
    
    if currFrame > currFrame:
        return
    if currFrame >= startAt and currFrame <= endFrame:
        index = 0
        ribName = "%s.%s.rib" % (getSceneName(), addPadding(currFrame))
        pathToRib = getDataDir() + "/" + ribName
        print pathToRib
        fileid = open(pathToRib, 'w')
        fileid.write(getBlobby(tnode, scale))
        fileid.close()


Listing 5.3 (animateBlobbies.key)


Option "searchpath" "archive" "PATH_TO_PREBAKED_RIBS"
Format 270 270 1
ShadingRate 1
Imager "background" "background" [1 1 1]
#Display "untitled" "it" "rgb"
Display "untitled.tif" "tiff" "rgb"
  
Tween "from" 1 "to" 2 "frames" 100
Tween "output" "all"
#Tween "output" 1
KeyFrameBegin 1
    Projection "perspective" "fov" 20
    Translate  0 0 15
    Rotate 0   1 0 0
    Rotate 0   0 1 0
    Scale 1 1 -1
    Imager "background" "background" [1 1 1]
    WorldBegin
        LightSource "distantlight" 1 "intensity" 1.5 "from" [1 1 1] "to" [0 0 0]
        Surface "plastic" "Ks" 0.2
        ReadArchive "particlesToBlobbies.0001.rib"
    WorldEnd
KeyFrameEnd
  
KeyFrameBegin 2
    Projection "perspective" "fov" 20
    Translate  0 0 15
    Rotate 0   1 0 0
    Rotate 0   0 1 0
    Scale 1 1 -1
    Imager "background" "background" [1 1 1]
    WorldBegin
        LightSource "distantlight" 1 "intensity" 1.5 "from" [1 1 1] "to" [0 0 0]
        Surface "plastic" "Ks" 0.2
        ReadArchive "particlesToBlobbies.0100.rib"
    WorldEnd
KeyFrameEnd


Example 6 - Texture Map as Curves

This example demonstrates the use of a image map to place curves on a nurbs surface. For simplicity a nurbs plane was chosen as the target surface. In doing so issues relating to surface normals are avoided. However, querying the normals is easy because the pointOnSurface proc has a -normalizedNormal flag ie.


Figure 12 - texture image


Figure 13


Listing 6 (addCurvesToTexture.mel)


global proc string placeCurveAt(float $pnt[], float $d1, float $d2, float $length)
{
vector $v1 = rand(-0.01, 0.01);
vector $v2 = rand(-0.01, 0.01);
vector $v3 = rand(-0.01, 0.01);
string $cmd = "curve -d 3 -p " + $pnt[0] + " " + $pnt[1] + " " + $pnt[2] +
        " -p " + ($pnt[0] + $v1.x) + " " + ($pnt[1] + $d1) + " " + ($pnt[2] + $v1.z) +
        " -p " + ($pnt[0] + $v2.x) + " " + ($pnt[1] + $d2) + " " + ($pnt[2] + $v2.z) +
        " -p " + ($pnt[0] + $v3.x) + " " + ($pnt[1] + $length) + " " + ($pnt[2] + $v3.z) +
        ";\n";
return $cmd;
}
            
global proc addCurvesToTexture(string $path, string $tnode, string $fileNode, 
                        float $length, int $samples)
{
// Grab all the rgb samples
float     $rgb[] = `colorAtPoint -o RGB -su $samples -sv $samples 
                                -minU 0.0 -minV 0.0 
                                -maxU 1.0 -maxV 1.0 $fileNode`;
print("Number of samples = " + (size($rgb)) + "\n");
  
float     $deltaU = 1.0/($samples - 1);
float     $deltaV = 1.0/($samples - 1);
float     $currU = 0.0, $currV = 0.0;
int       $index = 0, $count = 0;
int       $fileid = fopen($path, "w");
  
for($n = 0; $n < $samples; $n++)
    {
    $currU += $deltaU;
    $currV = 0.0; //$minV;
    for($i = 0; $i < $samples; $i++)
        {
        $len3 = rand($length * 0.5, $length);
        float    $len1 = $len3 * 0.33;
        float    $len2 = $len3 * 0.66;
  
        float $r = $rgb[$index];
        float $g = $rgb[$index + 1];
        float $b = $rgb[$index + 2];
        float $grayscale = ($r + $g + $b)/3;
        if($grayscale < 0.8)
            {
            // Notice the use of small offsets to improve the accuracy
            // of the placement of the curves
            float $p[] = `pointOnSurface -u ($currU - 0.01) 
                                         -v ($currV - 0.005) $tnode`;
            $cmd = placeCurveAt($p, $len1, $len2, $len3);
            fprint($fileid, $cmd);
            $count++;
            }        
        $index += 3;
        $currV += $deltaV;
        }
    }
fclose $fileid;
print("Number of curves = " + $count + "\n");
}
  
// Assigns the given image to the currently selected shape    
global proc string assignTextureTo(string $tnode, string $imgPath, int $showTex)
{
string $fileNode = `createNode file`;
string $shaderNode = `createNode lambert`;
  
// Connect the nodes
connectAttr ($fileNode + ".outColor") ($shaderNode + ".color");
  
// Insert the image path in the file node
setAttr -type "string" ($fileNode + ".fileTextureName") $imgPath;
          
// Assign the shader via the transform node
if($showTex) {
    select -r $tnode;
    hyperShade -assign $shaderNode;
    DisplayShadedAndTextured;
    }
return $fileNode;
}
  
  
string  $projPath = `workspace -q -rootDirectory`;
string  $melpath = $projPath + "data/grass.mel";
string  $imgpath = $projPath + "images/squares.jpg";
string  $fileNode = assignTextureTo("nurbsPlane1", $imgpath, 1);
  
addCurvesToTexture($melpath, "nurbsPlane1", $fileNode, 0.1, 100);
  
// Delete the "old" curves
string $curves[] = `ls "curve*"`;
if(size($curves) > 0)
    delete $curves;
  
// Load the "new" curves
string $cmd = "source \"" + $melpath + "\";";
eval($cmd);
  
// Group the "new" curves
$curves = `ls "curve*"`;
if(size($curves) > 0)
    group $curves;


© 2002- Malcolm Kesson. All rights reserved.